QuickInfo
Text labels provide the response alternatives (e.g., strongly agree, female, >10,000, and so forth, very positive) for scale response and thought rating items. Simply type whatever label you want in the Text Label field of a response option. If you specify none, for a given text label, then that label will appear blank. This can be used, for example, to create a scale anchored only at the ends.
The text label field is also where you can define alternative values to appear for a particular answer choice in items like scale responses. This feature is useful to ensure that a single value is entered into data files no matter how a response is made for items like scale response and multiple choice in .que files.
Hints
You can also now include <specify> in the text label of any response option. This will not be displayed to the subject but will cause MediaLab to prompt subjects to enter a text response. This is handy in cases where you want to provide an alternative such as "other." For example, if you wanted a response option to be labeled as "other" and you wanted subjects to specify what "other" means, then enter other <specify> in the Text Label field for that response choice. The actual text response will be written to the data file.
Also note that copying and pasting a questionnaire item using the <specify> options, all the copied items will also contain the <specify> option.
Advanced Hints
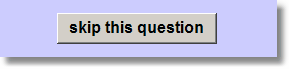
If you want to specify a specific location for a button you can add top and left parameters to the Text Label field for that response option. For example, if you want to relocate a button with a text label of "skip this question" then you could type
Skip this question (t.7,l.7)
in the Text Label field for that response option. That would make the button appear 70% of the way across and 70% of the way down the screen.
If you want to adjust the size of the button you can add height and width parameters to the Text Label field for that response option. In the example above, if you wanted to resize the button as well as relocating it, you could type
Skip this question (t.7,l.7)
in the Text Label field for that response option. This would produce the same result as above except the label would be 20% of the screen width.
Finally, if you want to place the text label within the button itself, then simply put the text label in the Label field the parameters in the Text Label field for that response option, like this:

The result will be:
Inserting Variables in Response Options
You can also insert prior responses from fill-in-the-blank items, scale responses, multiple responses, and any response.xls variables you have calculated into the response options of any subsequent item that allows response options in the same Questionnaire File. Simply type the item name with a set of <>, like this: <item_name>. For example, if you have items named "friend1" and "friend2" you could have whatever was recorded for those items appear in the response options for a later item like this:
1. I would pick <friend1>
2. I would pick <friend2>
Whatever value was recorded for the "friend1" item will appear in place of <friend1>, and whatever value was recorded for the "friend2" item will appear in place of <friend2>. Remember that to insert a variable into an item, that variable must first have a response recorded in the data file.
Using HTML for Labels
If you want to create custom formatted or graphic labels for your scale response options, you can enter an HTML file or URL in place of the standard text label. This can be used to present formatted text or images beside each button.
Here is an example. Paste this code into a text file and save it as "label1.htm" in your experiment folder. You can preview the result by opening the file in Internet Explorer.
<body style="font: 12pt arial; color: navy; background: #ccccff; margin: 0px">
<i>Strongly</i> Agree
</body>
Enter "label1.htm" for your button label and this is how it will appear:

See also
Questoinnaire (.que) Files > Labels, especially for information regarding valid input options and recoding response data