BMP vs. JPG & GIF
DirectRT uses bitmap (.BMP) images. The reason is that bitmap images are not compressed the way jpeg or gif files are. What's so good about that?! Yes it means bigger files taking up more hard drive space; your pain is felt. The benefit is SPEED. Because bitmap files are not compressed, they do not need to be DE-compressed prior to their display. This hastens things up considerably.
8-Bit, 256 Colours vs. 24-Bit, Millions of Colours
You can further ease the processing load on your computers by converting your images to 8-bit (256 color) depth. This will cut your file size down by two thirds! This can be done with little loss of image quality. If you don't have a utility for doing this, there is a freeware program called IrfanView that does a great job. Find it at http://www.irfanview.com/.
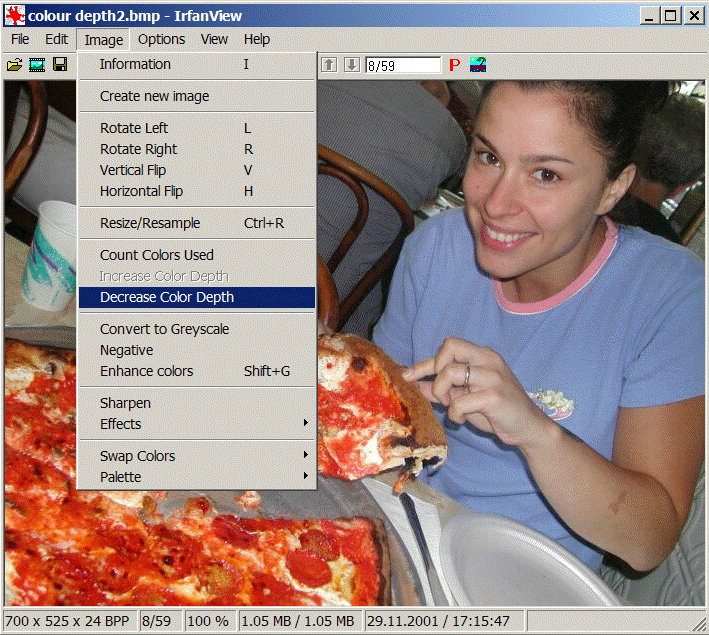
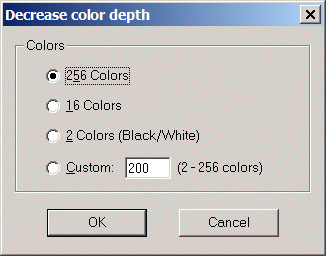
With IrfanView, to convert from 24bit to 8bit color (see Figure):
•Open the image, from the Image Menu, select Decrease Color Depth
•Select 256 colors and save your image. Check the difference in file size!


Using Fireworks
You can always use text and text files for presenting instructions. However, sometimes, you may want more control over formatting. In such cases, you can create instruction screens with your favorite image editor and save the results as a .bmp image file. Many of the samples use instruction screens that were created with a program called Fireworks produced by Macromedia (e.g., Open Ended Responses). The text for the instruction screens is easily formatted in Fireworks and then saved as a .bmp image in the experiment's stim folder. Some sample Fireworks source files (.png) are located in the IAT sample's stim folder. Fireworks files can be easily created and edited by downloading the trial version:
https://creative.adobe.com/products/fireworks
Simply open the corresponding .png file in Fireworks and edit the text. To save your changes as an image file, select "Export" and choose to save it in the .bmp image format. Fireworks is a great program for creating high quality text-based images.
Creating Graphics with PowerPoint
The Priming with Images sample illustrates how you can use PowerPoint to create graphics to use in your DirectRT session. To do this follow these steps:
•Set your system's display settings to match the screen resolution in which you'll be running your DirectRT session (e.g., 640x480, 800x600, 1024x768).
▪Run your PowerPoint show at this resolution.
▪For each screen, when it appears, press PrintScreen. Press Esc to stop the show and minimize PowerPoint.
▪Open your graphics application and select Paste. The screen image will be pasted into your graphics application as a graphic.
▪Save the image as a .bmp file. Remember that DirectRT can process the image much faster if you save it in 8-bit or 256 colors.
From Other Windows
You can also capture the contents of any open window as a graphic by pressing Alt-PrintScreen. By pressing Alt when you hit PrintScreen, you limit the graphic to the currently active window. Hitting PrintScreen alone capture the entire screen. Then, open your graphics application and Paste the image and edit it as necessary.
Creating scales
Creating scale images with ticks and equal distances between the ticks can be tricky in standard graphics applications. The scale image used in the Assessing Modern Racism sample was done as follows:
▪Start Excel or another spreadsheet application.
▪Select all the cells and choose a color fill (e.g., black).
▪Select all the cells and select a fairly thick color border (e.g., yellow).
▪Select a common column width according to how far apart your scale points should be graphically.
▪Use the Alt-PrintScreen method described above to capture the window as a graphic.
▪Paste the image into any graphics editor and trim the excess away leaving your scale and tick marks.
▪Add text labels as desired and save.