Location:
…\DirectRT\samples\5- other features\12 voice responses stroop
Sample Description
These samples illustrate how to assess reaction times through a microphone connected to your sound card and how to optionally record voice responses as sound files on your hard drive.
Collecting Voice Responses
With all of the voice response methods, you will need to make sure you have a microphone connected to the microphone input connector on your sound card. You will also need to make sure that the microphone is active and able to record. Finally, you will need to tell DirectRT how sensitive it should be in detecting response times.
To make all this easier, DirectRT comes with a tool called SoundCheck, which can be located on the Tools menu of DirectRT. When you run SoundCheck, this is what you'll see:
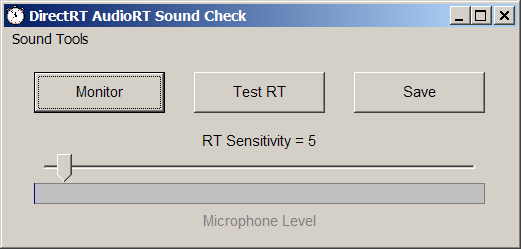
After making sure your microphone is plugged into your soundcard, click "Monitor" and speak into the microphone. If all is well, you should see the bar labeled "Microphone Level" respond immediately to your voice. If that works, then click "Stop" to end the monitoring. Now try a sample voice rt. Click "Test RT" and then speak into the microphone. SoundCheck should report the response time in milliseconds.
If you need to speak too loudly to set off the test, then try moving the sensitivity slider toward the left. If the test is set off too easily, then try moving the sensitivity slider toward the right. Try this until you find an RT sensitivity that works well for you. When you are happy with the sensitivity, click "Save." This will make the new sensitivity level available to DirectRT when you run a session with voice responses.
It is advisable to run a few test RTs on any machine before running a DirectRT session with voice responses for the first time. When running the samples in this folder, if you repeatedly get the message "please wait for the stimulus" this means the RT sensitivity value is set too low. Alternatively, if you repeatedly get the message "please try to respond faster" then the RT sensitivity value is set too high.
Note that the SoundCheck program provides access to other sound utilities by clicking on "SoundTools" in the top left corner. Access to these additional tools is provided here in case you have problems with your test RTs.
Voice Response Methods
Automatic Continuation Method
The easiest to implement of all the voice response methods, this traditional method instructs DirectRT to simply wait until a voice response occurs and then to immediately continue with the next stimulus or trial. This is illustrated in the sample input file "stroop automatic.csv:"
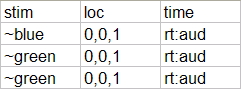
Notice that for a voice RT, all we need to do is enter "rt:aud" in the time column. In place of keycodes, we tell DirectRT to wait for auditory input from the sound card.
Fixed Time Method
With the fixed time method, you specify the amount of time you want DirectRT to monitor the microphone. This time period can range from 100ms up to much longer periods (e.g., 5 minutes, or 300000ms). You can also request that DirectRT save the incoming sound as a .wav sound file in a folder so you can listen to it later. Take a look at the sample input file "stroop fixed.csv" in this folder. We see that on each trial, a voice response is requested by entering "rt:aud" in the Stim column, followed by the fixed amount of time we want DirectRT to monitor the microphone. In this case, we ask DirectRT to monitor the microphone for 1500ms. In this sample, we also ask DirectRT to save the incoming sound on each trial as a sound file by inserting "rec" (short for "record") which could optionally be omitted.
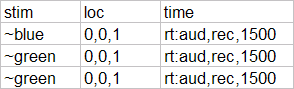
When the response is set to begin, DirectRT begins monitoring the incoming sound and keeps doing so until the time limit you set has expired. When the time limit expires, DirectRT will continue with next stimulus or trial. If you requested that DirectRT save the sound (using "rec"), then it will be saved to the data folder so that you can listen to it later for coding, response verification, or some other purpose.
Combo Method
A third option combines the first two. In this method, DirectRT will wait until a voice response has occurred and then-from that point-will wait an additional period of time that you specify. For example, if you want DirectRT to continue 500ms after each response then you can specify this the same way as with the Fixed Time method, but with a negative time value. The negative time value tells DirectRT that you want the Combo Method rather than the Fixed Time method. This is illustrated in the sample "stroop combo.csv:"
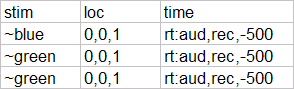
This method is especially useful if you want to proceed immediately after participants respond, but you also want to save participants' verbal responses as sound files. By specifying an additional fixed time, DirectRT will continue recording just long enough to capture the verbal response (otherwise, you would record only the first few milliseconds!). Larger negative values will cause DirectRT to wait longer after the initial sound before continuing.
See also: MinMax Values (which apply as usual just like any other RT) for details on how to set additional limits for the RT, clearing the stimulus before or after the RT and so on.
Advanced Hint
Note that you can specify valid keycodes prior to the audio functions to allow a keypress to be stored with the audio data. This is especially useful if an experimenter wants to code responses via the keyboard after each of the participant's vocal responses. For example:
rt:any,aud,rec,-1500,clear-1
will take an audio RT, clear the stimulus from the screen at the RT, record the response for 1500ms beyond the RT and will allow any keypress to be coded during that time.
rt:any,aud,rec,2000,clear500
This above example will take an audio RT, clear the stimulus 500ms after onset, record the response for a fixed interval of 2000ms and will allow any keypress to be coded during that time.